Adding a home disk to virtualbox virtual machine – Ubuntu VM
Introduction
Recently I ran out of space when using a Virtualbox virtual machine. Normally I use a dynamic disk that allows resizing (typically setting it to be much larger than I expect to use), but in this case I am using a virtual disk provided for me. It’s based on VMDK and Virtualbox does not have support for resizing a VMDK disk.
A lot of the space was used in the home directory (in my case this was different versions of Android software development kit) I added a second virtual drive and migrated the home partition over to the new drive, similar to how I’ve done it with real physical disks on servers before.
I have updated this after some more research into how VirtualBox handles drive allocations.
Warning !
First backup / clone your vm if not already done so.
WARNING – if run incorrectly you could lose all your data. the drive letters mentioned below may not match your virtual machine in which you will need to change the drive reference in the commands or you will lose data. Do NOT copy and paste the commands I have used unless you are 100% sure that you have the same setup as mine.
If you are using Linux as the host computer for the virtual machine then make sure you enter the commands on the appropriate system. Running the cfdisk / mkfs commands outside of the virtual machine could damage your host computer.
Adding the virtual disk drive
Create a second disk drive through the virtual machine manager
Choose a dynamically allocated disk and choose a large size – it will only use the size required, but can then expand so hopefully you won’t need to go through this again. I created one approximately 30GB in size.
I believe the name of the disk drive determines the order initial order in which it is listed and hence the drive letter allocated. It does not matter as we will be using a unique non-changing reference for each drive, but this will determine the exact commands that need to be run. Choosing a later filename (alphabetical) may avoid having to install grub onto the new disk (the last step).
You can also change the drive slot allocation by click on the drive in question and looking at the attributes shown to the right. A lower SATA port number will result in a lower drive allocation (eg. SATA 0 is normally /dev/sda – SATA 1 is normally /dev/sdb).

Start the virtual machine – boot using the existing drive
Depending upon how the disk has been attached it may complain about not being a bootable drive. You can either go back to the settings and change the drive to a higher slot location (eg. SATA 1 instead of SATA 0) or reboot and press F12 to boot from the second hard disk. We can fix this later.
Partition and format the new drive
Assuming that /etc/fstab uses the UUID (blkid command) of the disk drive then it should not matter if the disk allocation has changed for the drive.
From a terminal run df to determine the drive used for your root hard disk
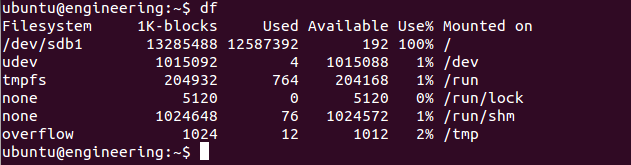
In this case it’s at /dev/sdb1 and so we need to make sure we don’t do anything to drive sdb as that’s our main operating system and current home directory. This may be different on your computer – MAKE SURE YOU CHECK!
run
ls /dev/sd*
and look what other drives exist. The physical drives are the ones without a digit on the end, which on my system are sda and sdb (sdb is the one that’s in use and so sda must be our new disk drive).
Partition the drive using the following command making sure that you use the correct drive.
cfdisk /dev/sda

Check that there are no partitions already defined and that the size in the top right matches the size of the drive you created. If not STOP!
Use NEW to create a new partition – accept the defaults of primary and use the entire disk size.
Choose WRITE and then QUIT.
You will now have a new partition with the device name previously but with a 1 on the end. In my case /dev/sda1
You can now format it as a Linux (ext4) partition using
sudo mkfs.ext4 /dev/sda1
MAKE SURE YOU ARE RUNNING THIS AGAINST THE CORRECT PARTITION. This will destroy all data on the partition and will NOT ask for confirmation before formatting the drive. Run a df again first to make sure and don’t use a drive if it’s listed.
Copy the data from the home directory
After formatting the drive it can be mounted to a temporary mount point
sudo mkdir /mnt/home
sudo mount /dev/sda1 /mnt/home
Check that it’s mounted correctly
ls /mnt/home
you should just see the one file called lost+found
Assuming you are not using an encrypted home partition then run the following:
sudo rsync -aXS /home/. /mnt/home/.
You may get a warning about not being able to copy .gvfs – you can ignore this warning.
You may also get a warning that some files/attrs were not transferred.
If you want to check that the copy has worked correctly then run
sudo diff -r /home /mnt/home
Note you will see the following differences which are all OK
lost+found (only in new copy)
.gvfs (only in old copy – not required)
Plus any files on the home directory that may have changed since the rsync (eg. .lesshst on my computer)
A list of about a dozen differences is normal, if you see some of your documents in the list of differences then the rsync may not have completed properly.
Update fstab and remount the drive
Now add the new drive to /etc/fstab. You need to add the drive using the UUID which is found using
sudo blkid /dev/sda1
The entry should then be added to /etc/fstab in the format
UUID=
as shown below

Now rename the current folder and create a mount point for the drive
cd /
sudo mv /home /home.old
sudo mkdir /home
Now run
sudo mount -a
You should find that the drive is mounted in the new location.
Whilst a reboot is not required then I think it’s a good idea to do one at this point to make sure everything is working, before removing the old home directory.
Grub setup
The virtual machine will attempt to boot from the first disk. If the new disk is earlier in the drive list than the main disk then it will try and boot that instead.
You should be able to change this by changing the drive slot allocation in the VirtualBox setings, but you can on a temporary basis hitting F12 each time you boot the VM.
If you have created a disk that is appearing earlier in the system (and have to use F12 to boot the system) then you can install Grub onto the new disk image so that it can boot from either drive (it will still look for the operating system on the original disk).
To install grub to the new drive
sudo grub-install /dev/sda
sudo update-grub
Rebooting the virtual machine should now boot straight into the virtual machine.
Summary
This is one way of increasing the storage on a virtual machine by adding a second virtual disk drive. There are other ways of achieving this (eg. cloning the disk into a different disk drive), this one has the advantage of creating a different virtual home drive which could be useful if you want to access the drive in another virtual machine image.
An alternative is to clone the existing drive into a larger drive. You can then create another partition on the drive – or if you want to be able to increase the existing partition, it is possible using gparted as long as the drive is not mounted. This may mean having to attach your disk drive to another virtual machine.